Using Maven Wrapper with JavaFX
Note that the certain maven commands (e.g., mvn git-code-format:format-code and mvn javafx:run@debug) need that certain plug-ins are declared in the pom.xml file. The pom.xml file of the project’s template code declares them, the pom.xml file of other JavaFX projects might not
Why Maven?
Every successful software team uses a build automation tool to facilitate the management of dependencies and to build software artifacts. Maven https://maven.apache.org/ is one of the most popular build automation tools for Java projects. 90% of all Java projects use Maven or Gradle (a different tool with similar functionalities).
In this course, we will use Maven to ensure that all of you are using the same version of JavaFX and of the required dependencies. You will also need to use Maven to compile and run your JavaFX application.
You will not need to install Maven, as we will use the Maven wrapper,
which is that mvnw file (if you are on Unix/MacOS) or mvnw.cmd (if you are on Windows) found in the root folder of the project (the folder with the pom.xml).
A Project Object Model or POM is Maven’s fundamental unit of work. It is an XML file (pom.xml) file located in the root folder of your project that contains information about the project and configuration details used by Maven to build the project. When you run a Maven command, Maven will look into that file and execute the given command.
Now we will see the Maven commands you should use in this course and how to add additional dependencies.
mvn compile
- Unix or MacOS:
./mvnw compile - Windows:
.\mvnw.cmd compile
This Maven phase is responsible for generating the *.class files based on the most recent *.java files. If there are no compilation errors in your *.java files, the *.class files will be created inside the target folder and you will see a BUILD SUCCESS message. If you have a compilation error with your code (such as incorrect Java syntax), you will see a BUILD FAILURE message instructing you to fix this before moving any further. With such compilation errors, you will not be able to run your JavaFX application.
mvn test
- Unix or MacOS:
./mvnw test - Windows:
.\mvnw.cmd test
Once your code is successfully compiled, it can be tested. Only after a successful mvn compile can you make it this far (i.e., you cannot test your code if it doesn’t compile). The test cases in your src/test/java folder are making use of JUnit, which is a framework providing a range of powerful ways to help you test your code. Maven takes care of retrieving the required version of JUnit, and connects it during this mvn test phase. If the code you wrote in the src/main/java folder meets all the logic expected from the test cases in the src/test/java folder, you will see a BUILD SUCCESS message. If your code has incorrect logic, you will see a BUILD FAILURE message instructing you which test case caused the failure.
The initial version of your project contains a couple of JUnit test cases to ensure that the DL prediction and Text2Speech work as expected. **We will not provide additional test cases, as this is a Design course. This is not an assignment with a model answer. However, ** You are encouraged to add more test cases to test your implementation, but these test cases will not be marked**.
mvn clean
- Unix or MacOS:
./mvnw clean - Windows:
.\mvnw.cmd clean
You would have seen all the various files generated and dumped under the target folder. These are files that can easily be re-generated, and aren’t ones we care to have hanging around. Also, sometimes we might want to delete them to be extra sure that the mvn compile is correctly generating the files. Therefore, by using the mvn clean phase, we can delete them all and have then generated freshly to have the reassurance we are running the latest logic.
mvn javafx:run
- Unix or MacOS:
./mvnw javafx:run - Windows:
.\mvnw.cmd javafx:run
This will compile and run your JavaFX application. It is better you also add the clean command before to make sure that it is compiling and running the latest logic.
- Unix or MacOS:
./mvnw clean javafx:run - Windows:
.\mvnw.cmd clean javafx:run
mvn javafx:run@debug
- Unix or MacOS:
./mvnw clean javafx:run@debug - Windows:
.\mvnw.cmd clean javafx:run@debug
You certainly will need to run your JavaFX application in debugging mode.
Polluting the code with System.out.println for debugging purposes is tedious, time-consuming, and considered a bad practice. It goes against our principles to avoid useless code See our code style guide.
One of the key features of IDEs is the “debugging mode”. This informative Stackoverflow post elaborates more on why you should avoid using print to debug and use the IDE debug mode instead: https://stackoverflow.com/questions/426569/why-is-debugging-better-in-an-ide
However, we are running JavaFX via Maven, and pressing the debug button will not work because the main class nz.ac.auckland.se206.App (in our project) cannot run by itself without configuring JavaFX, which is what we want to avoid in the first place by using Maven.
Error: JavaFX runtime components are missing, and are required to run this application
Note that you can still run in the debug mode your JUnit test cases, as they are not running with JavaFX.
However, No worries! in a few simple steps, you can run your JavaFX application in debug mode with your favorite IDE.
Step 1 Run the command:
- Unix or MacOS:
./mvnw clean javafx:run@debug - Windows:
.\mvnw.cmd clean javafx:run@debug
You should see the following output:
[INFO] --- javafx-maven-plugin:0.0.3:run (debug) @  ---
[INFO] Using 'UTF-8' encoding to copy filtered resources.
[INFO] Copying 6 resources
[INFO] Changes detected - recompiling the module!
[INFO] Compiling 5 source files to /Users/...../target/classes
Listening for transport dt_socket at address: 5005
The JavaFX application WILL NOT start yet, as it is waiting for the debug to be attached.
Step 2
mvn javafx:run@debug
- Unix or macOS:
./mvnw clean javafx:run@debug - Windows:
.\mvnw.cmd clean javafx:run@debug
You will likely need to run your JavaFX application in debugging mode while developing your project.
Using System.out.println statements for debugging is often tedious and time-consuming. Leaving unnecessary print statements in the code also reduces code quality and goes against the principles in our code style guide.
One of the most useful features provided by an IDE is its debugger. A debugger allows you to pause the application, inspect variables, evaluate expressions, and execute the code one line at a time.
This Stack Overflow discussion provides further information about the advantages of using a debugger instead of relying on print statements:
https://stackoverflow.com/questions/426569/why-is-debugging-better-in-an-ide
However, because we run JavaFX through Maven, pressing the IDE’s normal Run or Debug button may not work. The main class, nz.ac.auckland.se206.App, cannot run by itself unless JavaFX is configured correctly.
Attempting to run the class directly may produce the following error:
Error: JavaFX runtime components are missing, and are required to run this application
Maven provides the required JavaFX configuration, which is why the application should normally be started using javafx:run.
You can still run and debug JUnit test cases directly through your IDE because those tests do not normally launch the JavaFX application.
To debug the JavaFX application, Maven must first start it in debug mode. You can then attach your IDE’s debugger to the running Java process.
Step 1: Start the application in debug mode
Open a terminal in the root folder of your project—the folder containing pom.xml—and run:
-
Unix or macOS:
./mvnw clean javafx:run@debug -
Windows:
.\mvnw.cmd clean javafx:run@debug
You should see output similar to the following:
[INFO] --- javafx-maven-plugin:0.0.3:run (debug) @ project-name ---
[INFO] Using 'UTF-8' encoding to copy filtered resources.
[INFO] Copying 6 resources
[INFO] Changes detected - recompiling the module!
[INFO] Compiling 5 source files to .../target/classes
Listening for transport dt_socket at address: 5005
The JavaFX application will not start immediately. It is paused while waiting for a debugger to connect through port 5005.
Do not close this terminal while debugging.
Step 2: Add breakpoints
Before attaching the debugger, add one or more breakpoints in your code.
To add a breakpoint, click in the margin beside the line number where you want the application to pause. A breakpoint is normally displayed as a red circle.
Place the breakpoint on a line that will be executed after the application starts, such as:
- an event-handler method;
- a button-click handler;
- an initialization method;
- a method that processes user input; or
- a method containing logic that you want to inspect.
The debugger will pause only when execution reaches a line containing an active breakpoint.
Step 3: Attach the IDE debugger
IntelliJ IDEA
-
Open Run → Edit Configurations.
-
Click the + button.
-
Select Remote JVM Debug.
-
Give the configuration a descriptive name, such as
JavaFX Maven Debug. -
Set the host to:
localhost -
Set the port to:
5005 -
Click Apply, then OK.
-
Select the newly created configuration from the run-configuration menu.
-
Click the Debug button.
Once IntelliJ IDEA connects, the JavaFX application should start.
Visual Studio Code
Create or update the .vscode/launch.json file in your project and add the following configuration:
{
  "version": "0.2.0",
  "configurations": [
    {
      "type": "java",
      "name": "Attach to JavaFX through Maven",
      "request": "attach",
      "hostName": "localhost",
      "port": 5005
    }
  ]
}
Then:
- Open the Run and Debug panel.
- Select Attach to JavaFX through Maven.
- Click the green Start Debugging button.
Once Visual Studio Code connects, the JavaFX application should start.
Step 4: Debug the application
When the application reaches a breakpoint, the debugger will pause it. You can then use the debugger controls to inspect the application’s behaviour.
Common debugger actions include:
- Step Over: Execute the current line and move to the next line in the same method.
- Step Into: Enter a method called by the current line.
- Step Out: Finish the current method and return to the calling method.
- Resume: Continue execution until the next breakpoint is reached.
- Stop: Terminate the debugging session.
- Variables: Inspect the current values of local variables and object fields.
- Evaluate Expression: Run an expression while the application is paused.
- Call Stack: Inspect the sequence of method calls that led to the current line.
You can also hover over a variable while execution is paused to inspect its current value.
Step 5: Stop debugging
When you have finished debugging:
- Stop the debugging session in your IDE.
- Return to the terminal running Maven.
- Press
Ctrl+Cif the Maven process is still running.
You can then make further changes and start another debugging session by running the Maven debug command again.
Troubleshooting
The application remains on “Listening for transport dt_socket”
This is expected. Maven is waiting for your IDE debugger to connect to port 5005.
The debugger cannot connect to port 5005
Check that:
- the Maven debug command is still running;
- the terminal displays
Listening for transport dt_socket at address: 5005; - the IDE configuration uses
localhost; - the IDE configuration uses port
5005; and - another program is not already using port
5005.
Port 5005 is already in use
A previous Java or Maven process may still be running. Stop the previous process before starting a new debugging session.
On Unix or macOS, you can also check which process is using the port with:
lsof -i :5005
On Windows, you can use:
netstat -ano | findstr :5005
The breakpoint is not reached
Check that:
- the breakpoint is enabled;
- the relevant line of code is actually executed;
- the debugger successfully attached before the code was executed;
- the application was started using
javafx:run@debug; and - the source code shown by the IDE matches the version compiled by Maven.
It may help to stop the application and restart it using:
-
Unix or macOS:
./mvnw clean javafx:run@debug -
Windows:
.\mvnw.cmd clean javafx:run@debug
Important note about Maven plug-ins
Certain Maven commands, including mvn git-code-format:format-code and mvn javafx:run@debug, require the corresponding plug-ins and execution configurations to be declared in the project’s pom.xml file.
The pom.xml included with this course’s project template already contains the required configuration. A pom.xml copied from another JavaFX project may not support these commands.
Add external dependencies
YOU SHOULD NOT MODIFY EXISTING DEPENDENCIES AND CONFIGURATION. But you can and are encouraged to add as many external dependencies as you need.
We will cover this in class.
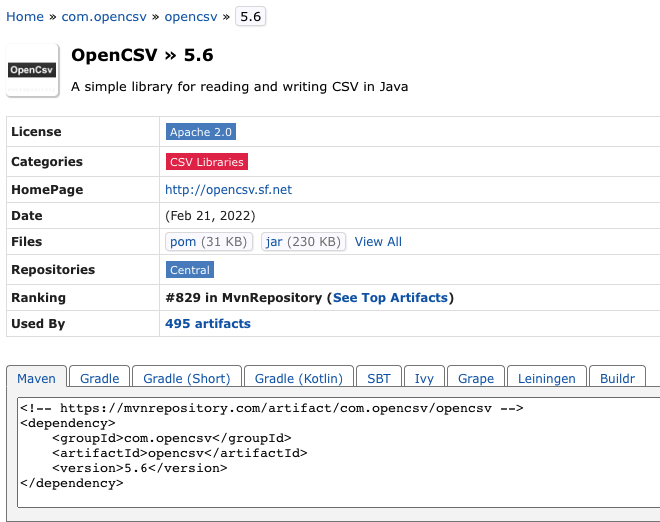
The only requirement is that such dependencies must be in the Maven central repository (https://mvnrepository.com). For example, if you want to read a CSV file, you are encouraged to use an existing library instead of re-inventing the wheel. One example is OpenCSV (https://mvnrepository.com/artifact/com.opencsv/opencsv). Click on the latest version:
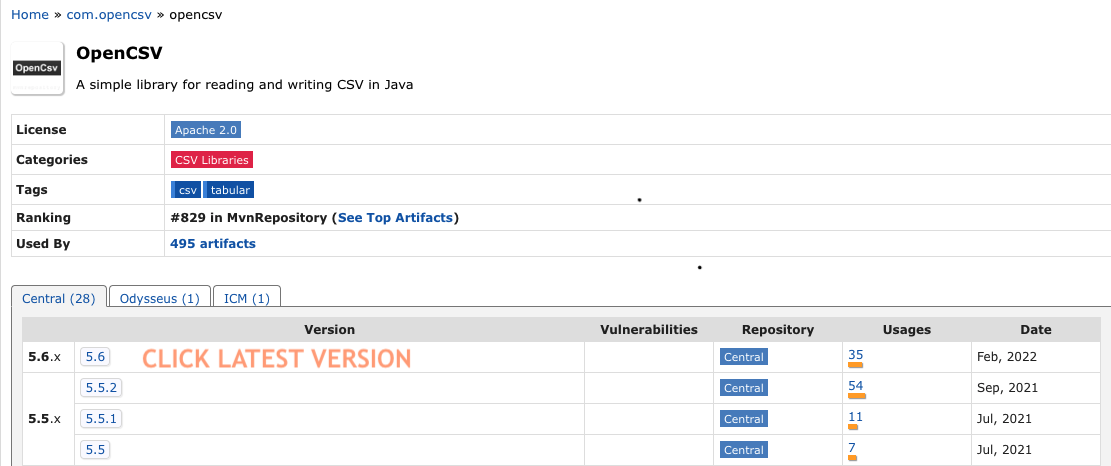
Copy and paste the Maven dependencies inside the <dependencies> tag and refresh the project. Maven will automatically download the jar and add it to the classpath.