
Project Starter Code
In this course, you will implement a game using JavaFX and AI technology (in particular, using OpenAI’s GPT model). You will need to implement a fully-fledged game with a lot of cool features! Ready?
Background
Artificial Intelligence (especially machine learning and deep learning – including Large Language Models) is becoming an increasingly more important part of Software Engineering. Indeed, it powers the core functionalities of many innovative tech solutions. Machine learning is achieving results that were unthinkable just a decade ago. For example, Google’s DeepMind AlphaGo artificial intelligence defeated (for the first time) the world’s number one Go champion. “Go” is a game with 10360 possible moves. There are more moves in a game of Go than atoms in the universe! More recently, large language models (LLMs) such as those powering ChatGPT have taken the world by storm with their amazing capabilities and functions. OpenAI’s GPT will power your project!
Guess Who? Initial Template
We have prepared an initial JavaFX template for the Alpha version, containing a very basic game with similar features to the one you need to implement. This template includes code that you can modify, seeing how chat completions and text to speech (TTS) work. Specifically, it:
- Has the necessary OpenAI (chat completions and TTS) and Google Cloud (TTS) communications already implemented for you.
- Implements the State design pattern to switch between game states.
- Provides an example of how to use GPT prompts loaded from files.
- Demonstrates how to read from a YAML file to load data for the game.
- Shows how to invoke code asynchronously (the template does so for the TextToSpeech).
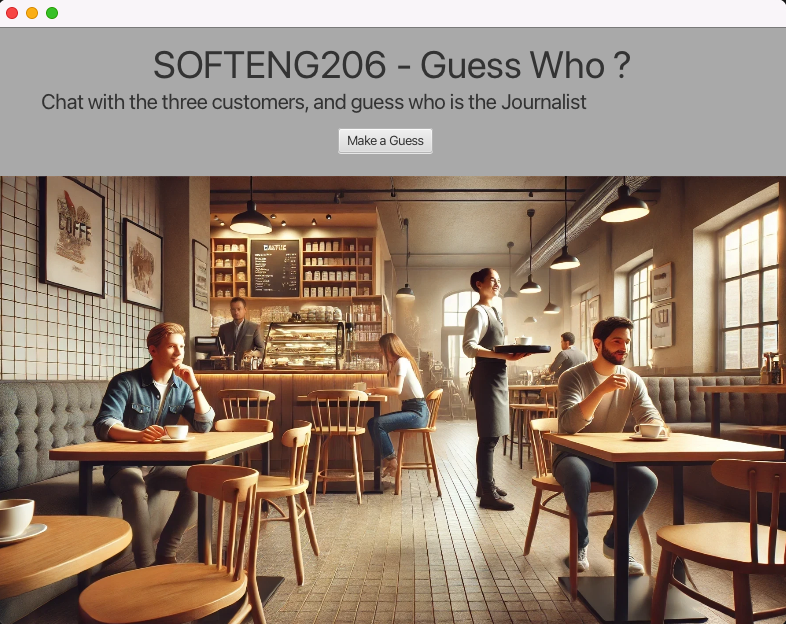
You are given an image that shows the inside of a coffee shop. The game involves chatting with three customers to guess their professions based on the conversation. For example, in the figure shown above, the profession to guess is a journalist. When the player is ready to make a guess, they will click on the “Make a Guess” button and then click on the customer they think is the journalist.
The interactivity of this version is fairly limited, and you will need to create your own game design specific to this year’s project. However, the version we provide demonstrates some core functionality as a proof of concept:
- Allows the player to click on the people in the room.
- Enables text-to-speech to make the interaction more engaging.
- Allows the player to chat with the customers, with GPT acting as a customer in a coffee shop. GPT is instructed to play the game using a simple prompt.
- Lets the player make guesses, with the application providing feedback on whether the guess was correct or not.
Initial Template (Code and Files)
Once you have accepted the GitHub invitation, you should clone the repository and open it with VS Code.
The folder src/main/java contains the Java source code:
nz.ac.auckland.se206.Appis the main class that runs the application.nz.ac.auckland.se206.controllers.*(RoomControllerandChatController) are the controller classes following the architectural design pattern MVC (Model-View-Controller). These controller classes are associated with the FXML (Effects eXtended Markup Language) filessrc/main/resources/fxml/*.fxml(room.fxmlandchat.fxml). FXML is an XML-based language used to develop the GUI for JavaFX applications. FXML files should be opened and modified via Scene Builder.nz.ac.auckland.se206.states.*are the states of the game following the behavioral design pattern State.nz.ac.auckland.se206.prompts.PromptEngineeringreads prompts insrc/main/resources/promptsand replaces placeholders with inputs. You should write your prompts as text files insrc/main/resources/promptsand use this class to load the prompts and replace the variables with the input you want.nz.ac.auckland.apiproxy.*are the classes that allow you to interact with the OpenAI GPT API via Java. You should not modify these existing classes and methods, as doing so may cause the GPT chats to malfunction.nz.ac.auckland.se206.GameStateContextis the context class for managing the state of the game. It handles transitions between different game states and maintains game data.nz.ac.auckland.se206.speech.TextToSpeechis the class that performs text-to-speech. The methodspeak()takes a string as input. You can change the class, including changing the voices. You can use the following code to make the app speak:
TextToSpeech.speak("Hello!");
Voices and Tokens
- OpenAI voices:
- These are charged at 4 tokens per character.
Suggestions:
- For audio that doesn’t need to be generated in real-time, you can pre-generate the audio and store it in your project (in the
resources/soundsfolder). This way, you can avoid re-generating the same audio (which costs tokens to over and over again, as well as the time it takes to generate the audio).
You can see samples of the voices given on the following websites:
The folder src/main/resources is used to store all your project resource files, like FXMLs, CSS, prompts, images, sounds, etc. Note that you should not put files generated while running the app in this folder, but only files needed to correctly build, render, and run the application.
The file pom.xml declares the dependencies of the project, including the JavaFX dependencies.
You should not modify existing dependencies and configurations. However, you can and are encouraged to add as many external dependencies as you need (see here for instructions).
How to Run the JavaFX App
Before running the app, make sure that OpenAI’s GPT works correctly. You must use the provided Maven wrapper.
./mvnw test for Unix/macOS or .\mvnw.cmd test for Windows
If there is a BUILD SUCCESS, you are good to go and can try to run the app.
To run the app, you must use the provided Maven wrapper. This is how the marker will compile and run the app.
You need to invoke the following command from the terminal:
./mvnw clean javafx:run for Unix/macOS or .\mvnw.cmd clean javafx:run for Windows
Remember to add apiproxy.config and codestyle.config with your credentials.