
Collaborative Git and Git Flows
For Beta and Final releases, you CANNOT use git rebase and/or git squash, as we need to see the full history of the project
This is a summary of the lecture for your convenience.
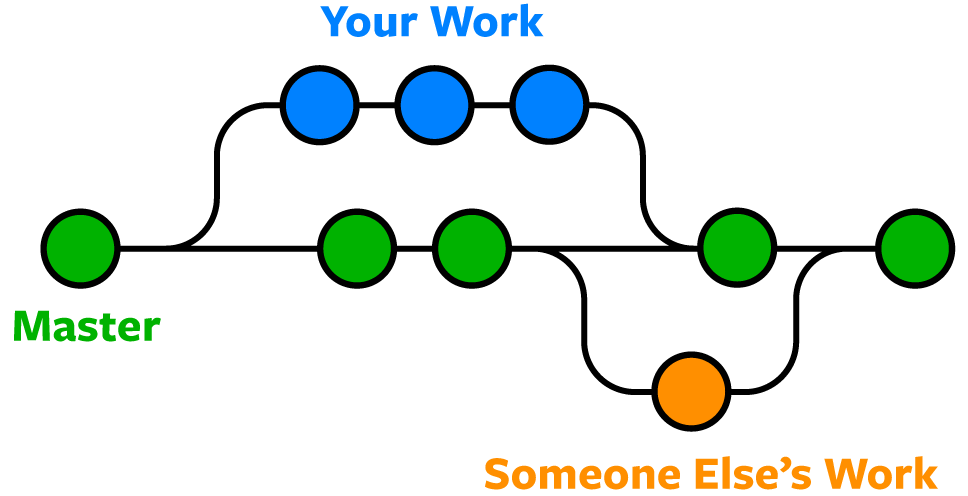
The importance of branching workflows for Git.
Version control systems (like Git) can help you manage collaborative work using branches, which are one of the key and fundamental features of Git. Branching means you diverge from the main line of development and continue to do work without messing with that main line. By default, the branch representing the main line of development is called main.
In other words, a branch represents an independent line of development. Eventually, if developers are satisfied with their implementation will merge these independent lines of development into the main branch.
While branches are not a new concept in version control systems, Git makes it extremely easy and fast to create, modify, delete, or merge branches. This is one of the main reasons why Git it is so popular and surpassed in popularity all other version control systems.
Branches become essential when working in a team. A single developer or a small group of developers can create a branch and work independently on it without messing with the main branch. Virtually every successful software project uses a branching workflow, which defines a set of rules on how to use git branches that All members of the same group should follow for making changes to the source code. In other words, branching workflows define what kind of branches to create and how and when to merge them together. There are many branch-based flows. In this course, we will use GitHub Flow, which is one of the easiest and most popular branching workflows. It is a lightweight workflow that works very well for individuals and small teams.
Git Branches.
Before diving into the GitHub Flow, let’s cover the basic branching commands.
Create a Branch
git branch new-idea  (create branch locally)
git checkout new-idea (switch to branch in your local repository)
git push --set-upstream origin new-idea (create upstream branch in the remote repository)
Let’s assume that you are on the main branch.
If you run the command git branch followed by the name of the branch (e.g., git branch new-idea), you create a logical copy of the main branch.
Then to switch to this new branch, run git checkout and the name of the branch: git checkout new-idea.
Now, you are not changing the ‘main’ branch. All the file changes you are making are going on this new branch.
This new branch is only in your local repository—your team members cannot see the branch and it is not safely backed up on the remote server.
You need to create an upstream branch with git push --set-upstream origin followed by the name of the branch: git push --set-upstream origin new-idea. If you do so, other team members can see your branch and contribute if they want to.
Merge a Branch
git checkout main (destination branch)
git pull (make sure you are on the latest version)
git merge new-idea (merge the new branch)
git push
Now you can work on this branch by committing and pushing. When you think you are ready to integrate the changes to the main branch, you must go back to the main branch: git checkout main. Do a pull in case there are new changes in the main. Then, git merge followed by the name of the branch: git merge new-idea. If there are conflicts, you should resolve them and push again. See the official GitHub instructions https://docs.github.com/en/pull-requests/collaborating-with-pull-requests/addressing-merge-conflicts/resolving-a-merge-conflict-using-the-command-line.
Delete a Branch
git branch -d new-idea (delete from the local repository)
git push origin --delete new-idea (delete from the remote repository)
After you merge the branch into the main, you can delete the branch both locally on the remote repository.
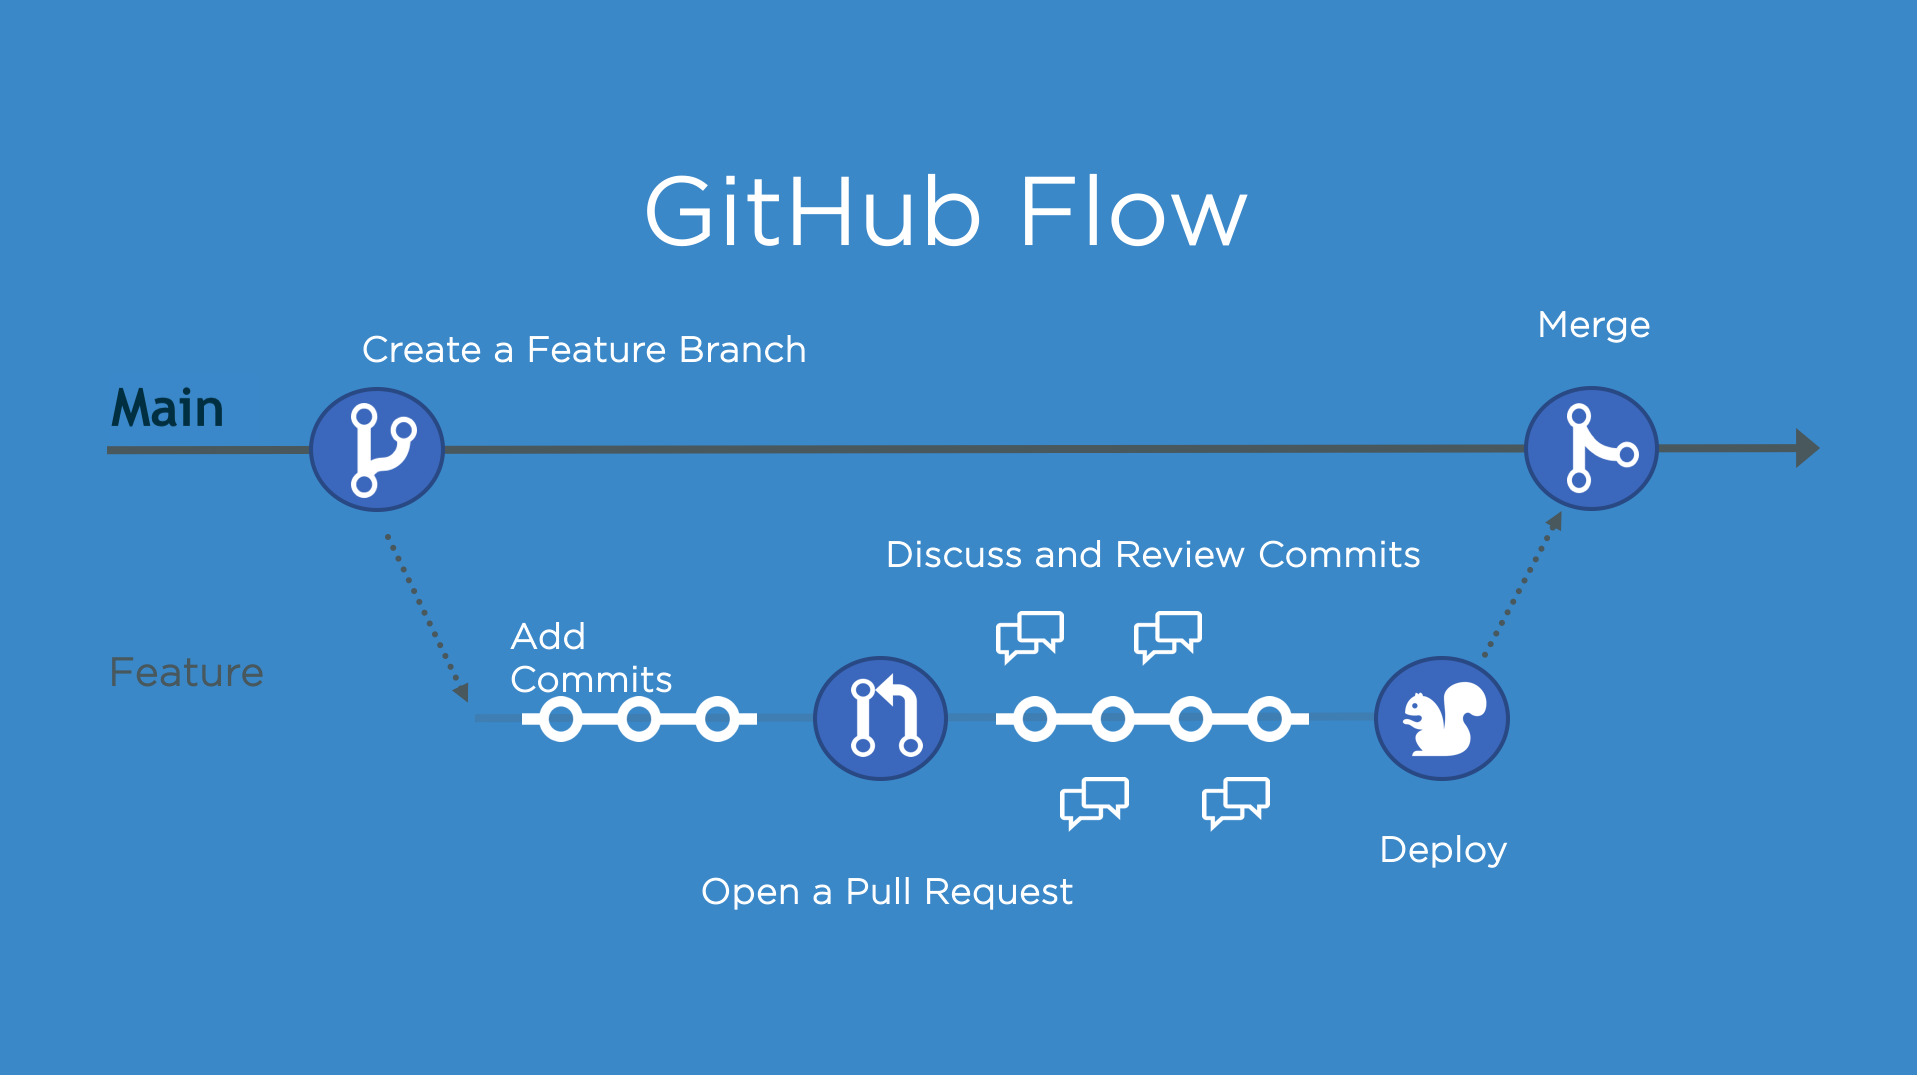
GitHub Flow
In this course, you must follow the GitHub Flow when implementing the Beta and Final releases.
The GitHub flow is very simple:
- Anything in the
mainbranch is deployable (it is a working version of the project that others can use) - To work on something new, create a branch off from
mainand give a descriptive name (e.g.,feature/new-game) - Commit to that branch locally and regularly push your work to the same named branch on the remote server
- When you need feedback or help, or you think the branch is ready for merging, open a
pull request. You should do that on GitHub.com, not on the command line. - Other team members might leave you comments and suggestions on how to improve your code. To address their suggestions, keep committing and pushing on the same branch—Git will update your pull request automatically.
- After someone else has reviewed and signed off on the feature, they will merge the branch into the main. They should do that on GitHub.com, not on the command line.
- After merge, then you or your team members can safely delete the branch
For a step-by-step guide, you should do the Git Lab, and you should also read very carefully what are the Git violations that we will mark for the Beta and Final releases git-best-practices/.