
JavaFX Fundamentals
 Get your hands dirty!
Be sure to complete the JavaFX Fundamentals lab exercise to practice all of these concepts.
Why JavaFX?
JavaFX is an open source, next generation client application platform for desktop, mobile and embedded systems built on Java. It is a collaborative effort by many individuals and companies with the goal of producing a modern, efficient, and fully featured toolkit for developing rich client applications.

One of the key advantages of JavaFX is that it can run on many different operating systems and devices:
- Windows,
- Linux,
- macOS,
- Android,
- iOS, and
- Raspberry Pi.
JavaFX also comes with a large set of built-in GUI components (such as buttons, text fields, tables, trees, menus, charts).
It supports both 2D and 3D Graphics (yes you can develop video games with JavaFX!).
Stages and Scenes in real-life plays
A lot of the concepts underpinning the structure of a JavaFX application appear to be modeling on how a play works at the theatre:
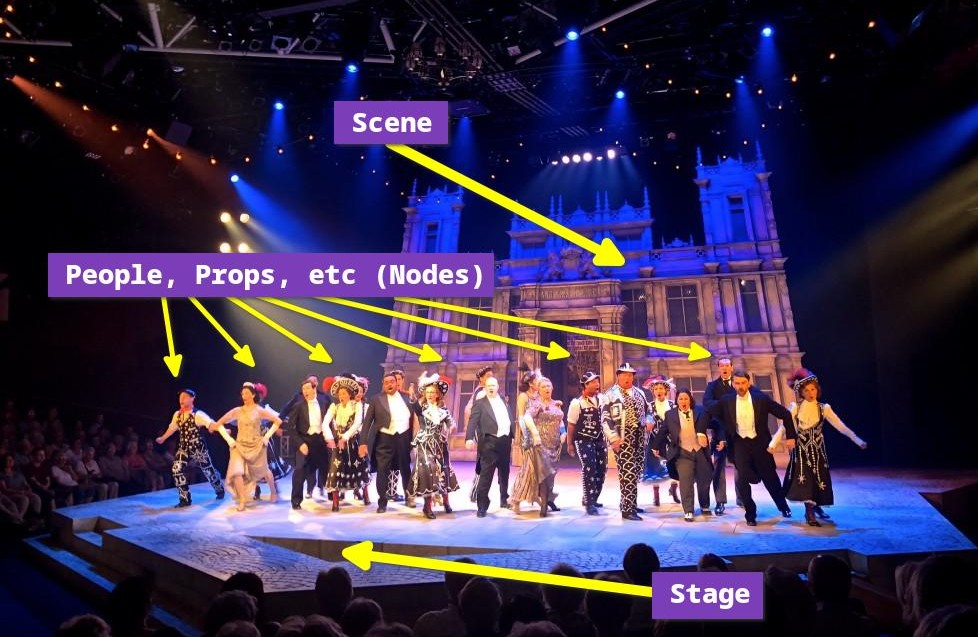
Some relevant terminology according to Wikipedia

Play
“A play is usually divided […] into scenes”
Scene
“Each scene is set at one specified location […] Changing locations usually requires changing the scenery, which takes time – even if merely a painted backdrop”
Stage
“A play is performed and written to be performed on stage”
Relating this to JavaFX
The key concepts structuring a JavaFX application are illustrated below:
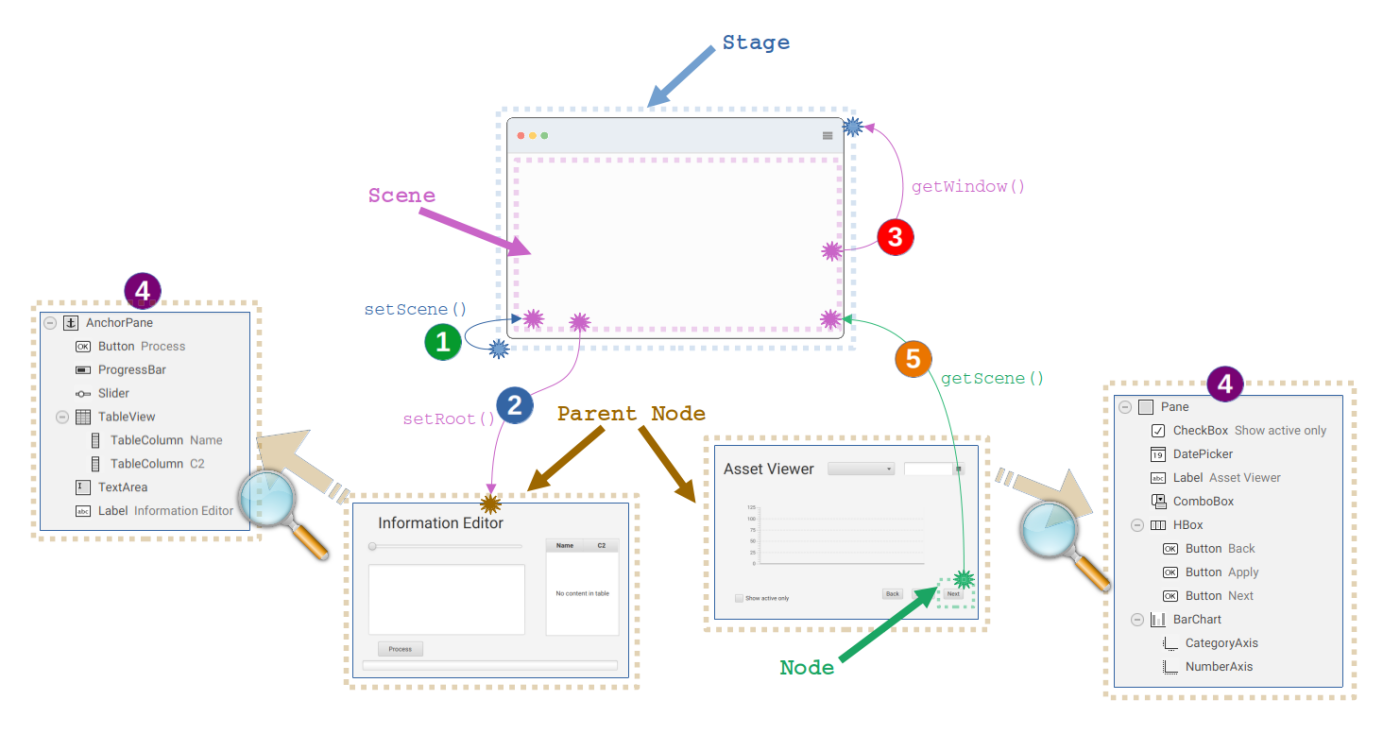
This includes:
- Stage: This is the window that appears to users. For simplicity, we will imagine there is only one stage. You can however create multiple
Stages if you want multiple windows in your application. In yourApplicationclass (e.g.,App.java), you will notice:- The
start()method takes in an instance of aStage. - An initial
Sceneis assigned to thatStageinstance using thesetScene()method ( ).
). - One way to change the content presented to the user is to replace an existing
Scenewith an entirely differentSceneinstance. This might be useful if you need aScenewith different settings. But in most cases, you can simply replace the rootNodeof the existingScene(see below).
- The
- Scene: This is where content will be placed so as to be presented to the user.
- Content is added using the
setRoot()method ( ). In most cases, this is enough to replace the
 Scene’s content (i.e., root) as opposed to replacing the entireScenewith anotherScene. - If for whatever reason you need the
Stage(Window) that aScenebelongs to, you can use thegetWindow()method ( ).
).
- Content is added using the
- Scene Graph composed of Nodes: All the visible components and layouts that help arrange them are known as
Nodes.- Content is constructed by developing in a tree structure of such
Nodes ( ). While you can do this manually in code, the recommended approach is to use a drag-and-drop software known as Scene Builder. When you use Scene Builder, it will create for you a file with an
 fxmlextension, and what’s inside it will correspond to serving the role of aNodeyou can use as the root. - If you ever need to access to the
Scenethat aNodeis in (e.g., when aButtonwas clicked and you want to change theScene’s content), then you can use thegetScene()method on theNode( ).
).
- Content is constructed by developing in a tree structure of such
Making sure you are set up for JavaFX
To make sure you have everything set up correctly, you can download the sample Hello World JavaFX project and run it.
See the instructions in the “How can I be sure that my machine is properly set up for doing the project and marking?” section of the FAQs.
Creating FXML files with Scene Builder
While it is most definitely possible to create our GUI by manually writing our own code, it’s not going to be a lot of fun!
Instead, you’re encouraged to use the Scene Builder drag-and-drop editor.
Scene Builder will allow you to easily create GUI content, so that you can focus purely on what it looks like:
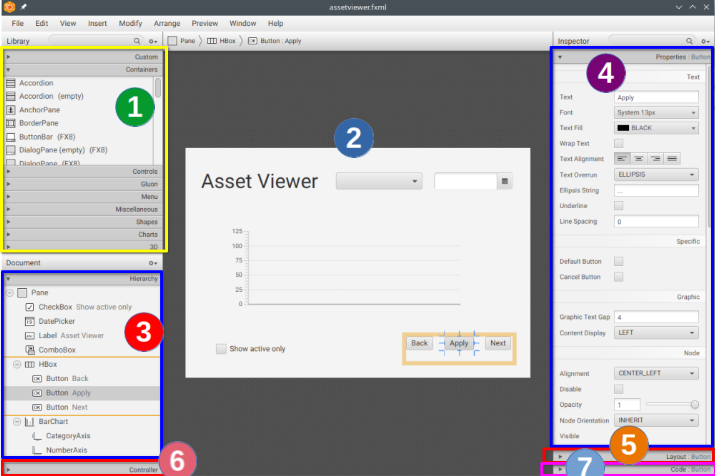
The key parts to Scene Builder include:
- The various controls, layouts, etc available to be used.
- The visual area where items are dragged onto.
- The structure of the scene graph as a tree hierarchy.
- Properties that can be modified on the selected element.
- Layout settings that can be modified on the selected element.
 Connecting the FXML file to its respective controller (a Java class).
 Connecting events on the element to event handlers (methods) in the controller class.
Underneath the hood, Scene Builder is generating an FXML file:
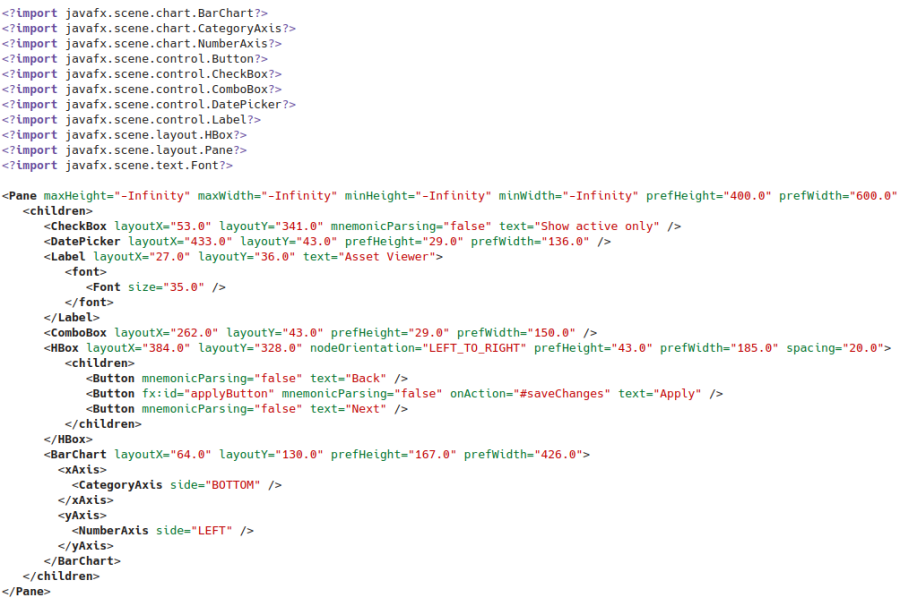
In order to use this FXML file in our JavaFX application, we need to get its root element (which is of type Parent—which extends Node) as follows:
FXMLLoader fxmlLoader = new FXMLLoader(App.class.getResource("/fxml/assetviewer.fxml"));
Parent root = fxmlLoader.load();
You can then go on to use that root and add it to your Scene:
scene = new Scene(root, 640, 480);
If your Scene already exists, you would use the setRoot() method:
scene.setRoot(root);
CSS
JavaFX allows you to style your components using CSS.
This makes it easy to support multiple themes for your GUI:
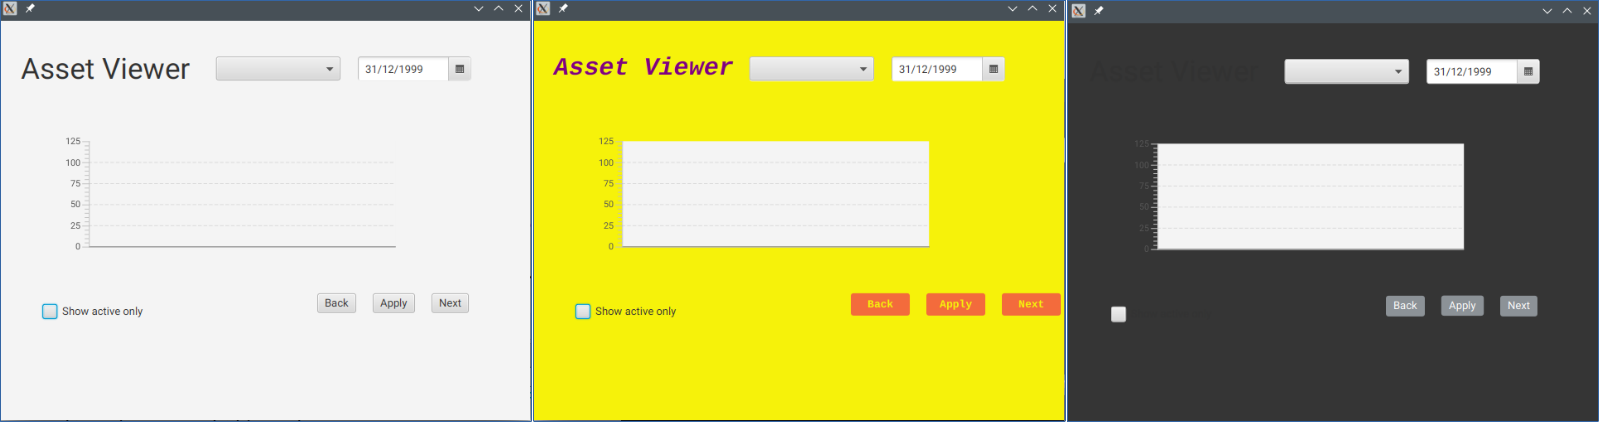
One way is to do this directly on a specific component:
myButton.setStyle("-fx-background-color: cornflowerblue; -fx-text-fill: ivory;");
But probably a more convenient way is to define CSS file(s), for example:
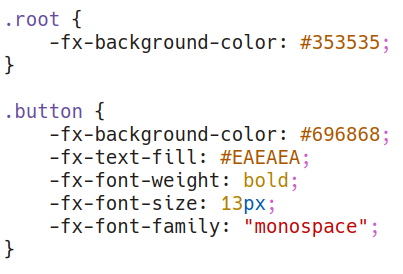
And then add it to your scene:
scene.getStylesheets().add(getClass().getResource("/css/darktheme.css").toExternalForm());
JavaFX CSS Reference Guide
You’ll find all the available properties you can use here:
https://openjfx.io/javadoc/21/javafx.graphics/javafx/scene/doc-files/cssref.html
There are plenty of helpful tutorials and videos online that you can learn more from.
Controllers
So, if FXML deals with the GUI only, then how do we implement the business logic? What happens when a button in the GUI is pressed? Where is the code that gets executed?
This is the job of a “Controller” class, which will be a standard Java file.
We would like you to follow the following convention when developing your JavaFX application:
For each FXML file, you should have an associated controller class for it.
File naming
To make it clear which Java controller file belongs to which FXML file, they should be named the same (but with the appropriate camel-casing convention for the controller Java file as well as the word “Controller”). For example:
counter.fxmlandCounterController.java,musicplayer.fxmlandMusicPlayerController.java,canvas.fxmlandCanvasController.java, etc.
You should also think of meaningful names for your *.java classes, and your packages (and sub-packages as needed).
The point is that your file naming should make it obvious for someone to know which file they need to open up to work on something.
File locations
It is essential to keep your project files clean and tidy.
You’ll notice in some online tutorials that they dump the FXML, CSS, and controller files all in the same directory.
Don’t do this!
You should follow this convention:
/src/main/javawill only contain*.javafiles. This includes whatever controllers you might introduce. You should also think about your package hierarchy. Don’t dump all the*.javafiles in the same package. Think of meaningful package structures. You can put all your controllers in acontrollerssub-package. If you have lots of controller files, try to create sub-packages under it. Similarly for the logic, think of meaningful groupings for your files./src/main/resourceswill include non-code files, things that your app uses (not creates). Sub-folders include:/src/main/resources/cssfor CSS files,/src/main/resources/fxmlfor FXML files,/src/main/resources/imagesfor images your app uses (not images it creates),/src/main/resources/soundsfor audio files,- You can make other categories depending on what your application involves.
Recommended JavaFX videos
The following playlist has some helpful videos to help you learn a lot of key JavaFX skills:
 Caution!
Skip the the first two videos in the playlist that show how to download and install JavaFX for Eclipse and IntelliJ. You should not install JavaFX following the online tutorial as the Maven setup we provide will install JavaFX for you. You also do not need to tell your IDE where JavaFX is installed.
Follow the instructions in the course website for the installation:
You can play with JavaFX using the provided hello world code, which has Maven and JavaFX already set for you:
https://www.youtube.com/playlist?list=PLZPZq0r_RZOM-8vJA3NQFZB7JroDcMwev